
G2 Wiring Harness - Recommended connection/disconnection procedures.
Antenna connections - Avoid possible PERMANENT DAMAGE to you G2 by following this Application Note.
If you think your G2 might be affected, please contact your SMT dealer or you can refer to our blog post on how to diagnose your G2 for wifi damage.
Application Note: G2 Power-on Sequence for firmware STA-170302
|
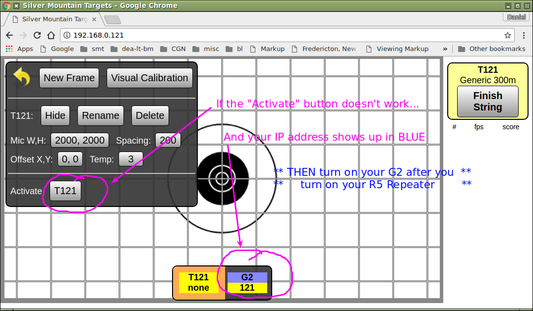
There is a minor usability bug in the current (but still recommended!!) G2 firmware "STA-170302".
You might encounter this in the "ADMIN-TARGETFRAME" menu when initially setting up a target; you should not expect to see this in ordinary day-to-day shooting use. If you can't "activate" your targetframe (change it from "yellow" to "green", and you see a blue icon with your IP address, make sure you power on your G2 *after* your R5. If you are on the firing line and the pits are sealed, you could also reboot it remotely under software control (see following Application Note) |
Application Note: Remotely Rebooting your G2
If you need to reboot your G2 from the firing line here's how you can do it. This has the same effect as pressing the power button.
Any open strings will be lost; if they are important to you, save them with the Finish String button.
Any open strings will be lost; if they are important to you, save them with the Finish String button.
|
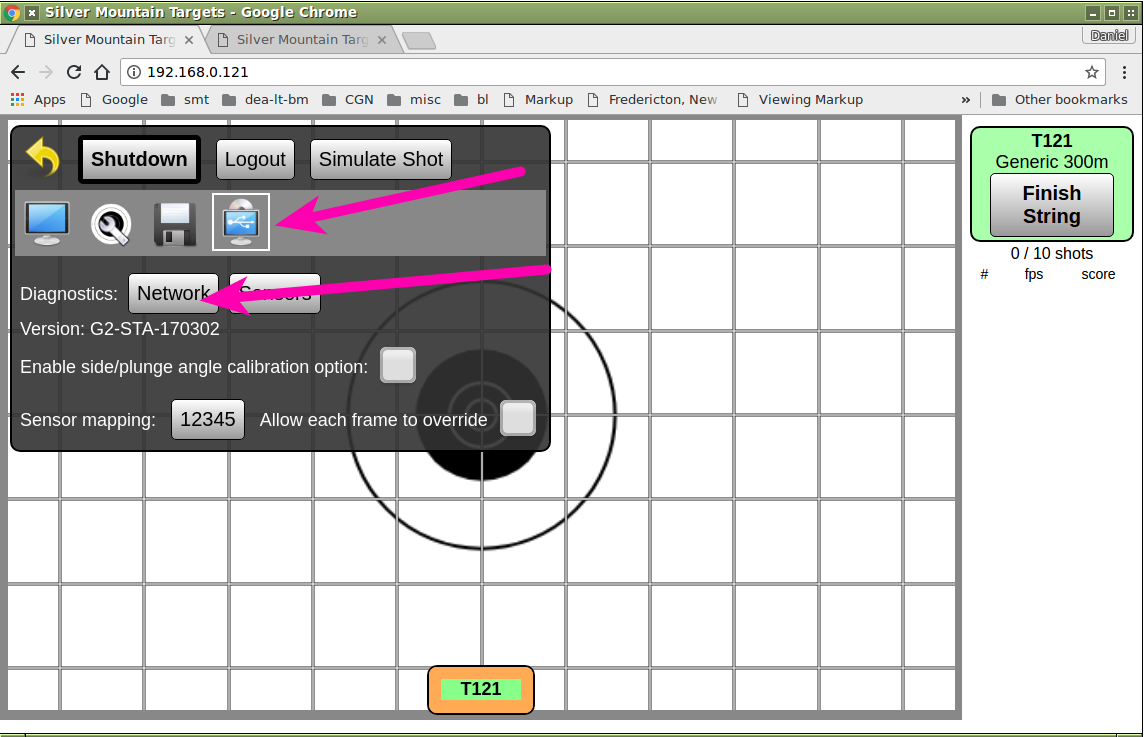
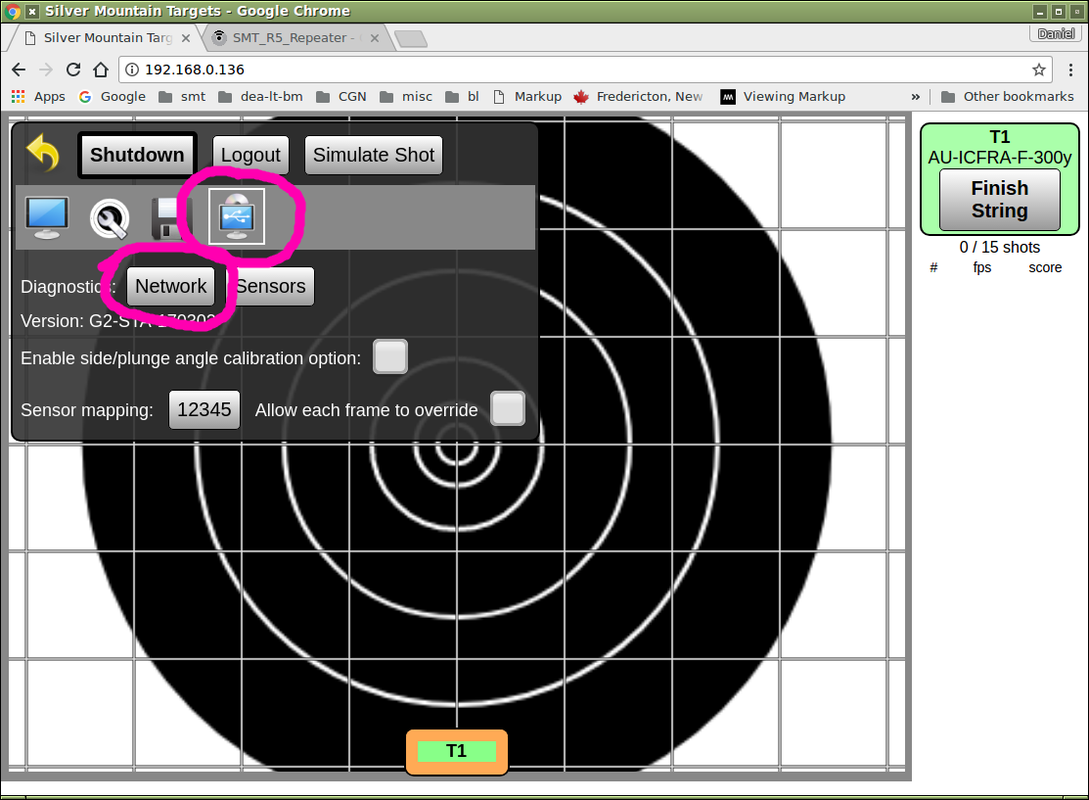
As user ADMIN, go to the GEARWHEEL ==> USB icon and click the Network button
|
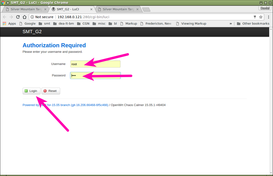
Now log in; the username is root and so is the password
|
Hover over System then select Reboot and then click Perform Reboot
Your G2 will reboot and should be back online in about 60 seconds. 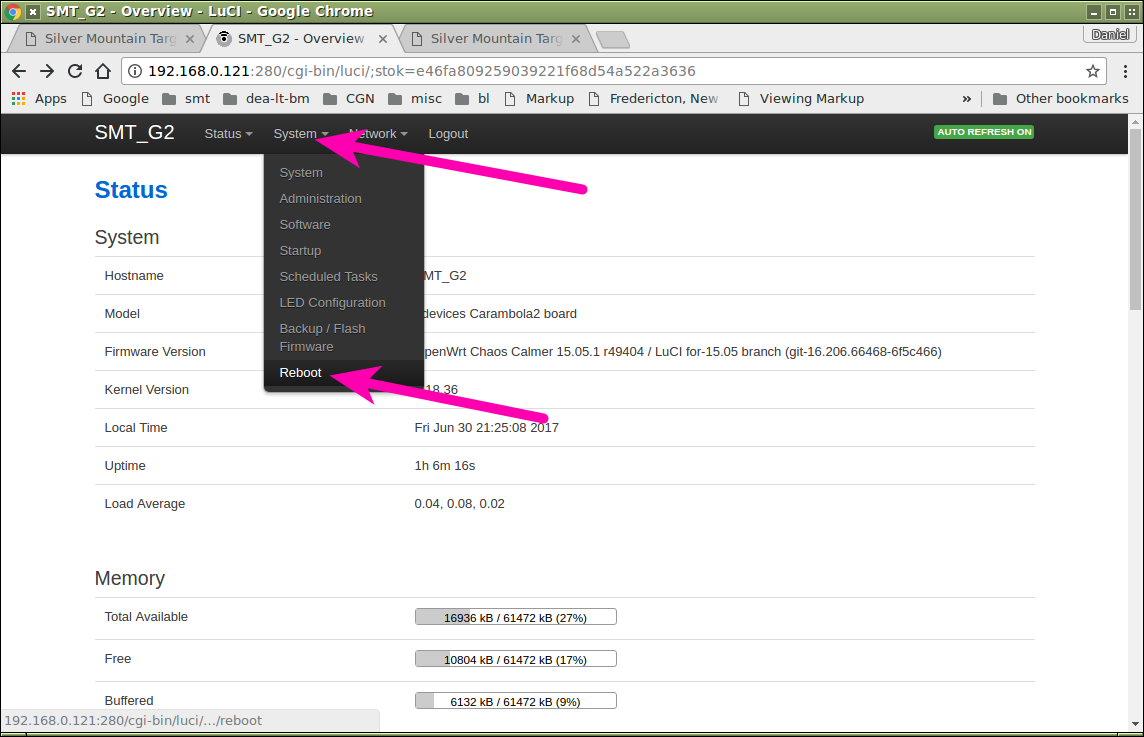
|
Application Note: Checking R5 Repeater Firmware Version
|
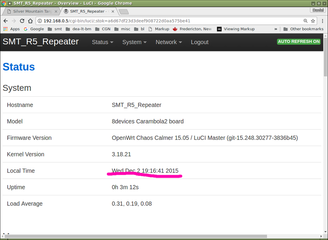
Turn on your R5 Repeater, connect your laptop or tablet's wifi to the SSID "SilverMountainTargets". Open a browser window to 192.168.0.5 and login, the username is root and the password is root. Examine the time according to the R5, if it is Dec 2 2015 then you have the latest firmware.
|
Using One G2 ShootersPac As a Stand-Alone Target
The G2 ShootersPac contains everything you need to run one e-target on a range.
Set up your G2 in the butts/pits, mounted below grade so it cannot be seen by the shooter or hit by a bullet. Mount the supplied panel antenna in an above-grade "visible" location where it has a clear line of sight to the firing line, so that the G2 unit is able to have a good wifi to the R5 Repeater on the firing line.
Put the R5 Repeater on the firing line near the shooter(s). The flat front surface with the logo and power button and indicator lights should face downrange so that it can "see" the target and the G2's panel antenna.
The stronger the wifi signal you can arrange, the faster and more reliable your system's wifi network will be. Generally speaking, the higher above ground level a G2 panel antenna and/or an R5 Repeater are mounted, the better,
For one or two shooters, setting the R5 on the ground or on a shooting bench is often a convenient mounting location. Its black mounting can also be attached to a vertical round item (such as a scope stand rod) with a hose clamp, or screwed to a vertical flat surface (such as a stick of wood or the face of a building)
If you are using the standard panel antenna for the G2 that has an integral 1m (3') cable, the best location is usually on the bottom left corner of the target frame, near or just above the dual sensor microphone unit..
If you want to install the G2 panel antenna at a higher location if a stronger G2->R5 signal is needed, you can use a longer cable, available from your SMT dealer or you can use a commercially available extender cable such as a "TP-Link TL-ANT24EC3S " (a 3 metre RP-SMA male to female extender cable). Avoid placing the panel antenna in the "9-o-clock" position; place it more than 1.5'(500mm) above or below "waterline" so that a bullet drifting across does not hit the antenna.
Two, three or four G2 ShootersPac operating at the same time
Up to four G2 ShootersPacs may be used on the same range at the same time. Each unit has its own IP address and they can share the use of one R5 Repeater. Other G2 e-targets (and the most recent shot on it!) are shown and accessible.
For best results please try the following:
For best results please try the following:
- Put the shooters relatively close to each other - don't separate them widely or put them on opposite ends of the firing line, it won't be possible for one R5 to provide reliable wifi coverage across the firing line.
- For best functioning, all G2s should be using the same firmware - ideally the latest version
- With any of the older G2 firmware versions, you MUST NOT have an R5 face any direction other than directly downrange at the targets and their panel antennas. Failing to do this can cause severe wifi network problems.
- Make sure there is no R5 Repeater running in the butts/pits
- Use ONLY ONE R5 Repeater on the firing line . Please resist the temptation to turn on every R5 Repeater you have available to you, usually you will be making things worse not better!
- Place the R5 Repeater in the center of the group of e-target shooters
- mount R5 Repeater as high as reasonably practical (4'-6' above ground level if possible)
- for best results, limit the number of viewer devices to no more than three per G2 and no more than 12 total
Five or more Standalone G2 ShootersPac (not officially supported)
Using more than four G2 ShootersPac on that same range at the same time is NOT RECOMMENDED; the R5 Repeater might not be able to deliver adequate wifi network performance/capacity or coverage area. The R5 Repeater is a modest device intended to be used with one or a few e-targets and a dozen or so viewing devices. This is not a hard and fast limit and if you want to push it you may try; you won't hurt or break anything but you are using the R5 Repeater out of the comfort zone.
The recommended way to run many targets is to use an S25 Server or any other high performance access point on the firing line.
If you must try using five or more G2s here are some recommendations on how to make the best of it:
The recommended way to run many targets is to use an S25 Server or any other high performance access point on the firing line.
If you must try using five or more G2s here are some recommendations on how to make the best of it:
- Your success will depend entirely on how good your on-the-firing-line wifi network works.
- Group together your e-target shooters on the firing line (consecutive targets or every second target)
- Use *one* R5 Repeater, mounted centrally amongst your shooters on the firing line
- Mount R5 Repeater as high as possible (4-6' above ground level is good; 8' even better)
- If wifi problems or sluggishness occurs, try limiting the number of "spectator" devices on the network, if necessary to only the active shooter and scorekeeper plus range officer
Using an S25 Server and Many G2s (5+) To Run a Larger Match or Event
For larger installations SMT recommends the use of an S25 Server.
A server performs two main functions:
For particularly wide firing lines (more than 15 lanes), dual-radio repeaters may be used on the "wings" to provide solid across-the-line coverage, or at a remote location (e.g. at a club house) to provide off-firing-line access to the system.
A server performs two main functions:
- to provide a high performance wifi network
- to provide enhanced functionality that can be useful for running many-target organized matches or events - including electronic score cards, users and profiles, "range officer" function mode, instant switching between targets
For particularly wide firing lines (more than 15 lanes), dual-radio repeaters may be used on the "wings" to provide solid across-the-line coverage, or at a remote location (e.g. at a club house) to provide off-firing-line access to the system.
HOWTO: updating your G2's Firmware
CAUTION TO AVOID DAMAGING YOUR G2, PLEASE READ FOLLOW THESE INSTRUCTIONS CAREFULLY,.
Install a freshly charged battery in your G2 (if the power fails during the firmware update process, your G2 can be BRICKED and must be sent back to the factory for recovery).
With your laptop or Android table, download the latest G2 firmware from the SMT website; where it is stored depends on the browser but Chrome for instance will put it in your "Downloads" directory.
Turn on your G2 and your R5 Repeater. Connect your laptop or Android table to the SilverMountainTargets wifi network and open a browser window to your G2 at 192.168.0.xx where "xx" is your unit's number written on its battery cap..
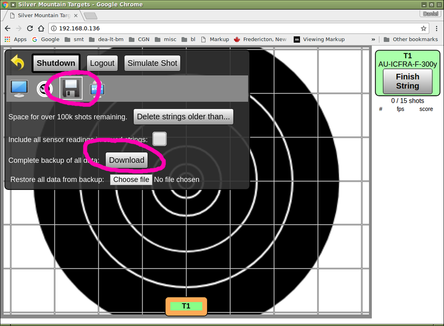
It is always a good idea to make a backup copy of the data on your G2.
Become ADMIN go to the GEARWHEEL menu and the "DISK" submenu and click on the Download button.
This will download a file named "backup.tgz",
It is always a good idea to make a backup copy of the data on your G2.
Become ADMIN go to the GEARWHEEL menu and the "DISK" submenu and click on the Download button.
This will download a file named "backup.tgz",
|
Go to the GEARWHEEL menu and the "USB" submenu and click on the Network button.
|

This will open up a new browser window, to the wifi router control page. Log in, the username is root and the password is root. Follow System -> Backup / Flash Firmware and click on it.
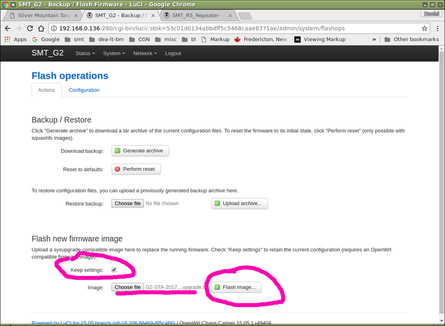
Leave the "Keep Settings" box TICKED, this will preserve your target frame data, calibration values, saved shot strings etc.
With the Choose File button, select the firmware image you have downloaded earlier, for example here we have chose the image name ""g2-sta-20170302-sysupgrade.bin.
Click on the Flash Image button, which will upload the firmware file and check it for errors
With the Choose File button, select the firmware image you have downloaded earlier, for example here we have chose the image name ""g2-sta-20170302-sysupgrade.bin.
Click on the Flash Image button, which will upload the firmware file and check it for errors
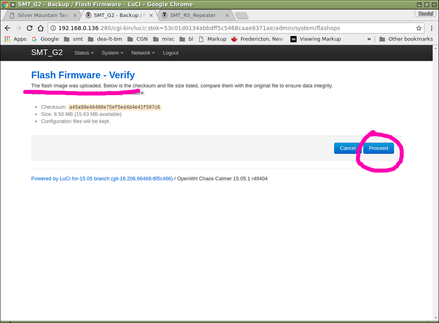
Click on the Proceed button
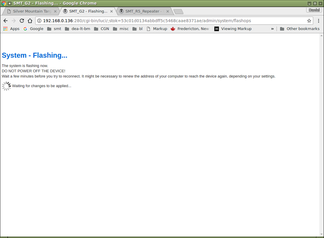
A "Flashing..." screen will now be displayed. This screen will stay like this forever, it does not change when the update is complete.
WAIT 5 MINUTES to ensure that the G2 firmware update is completed. During this time do not touch the G2 and most especially do not cycle its power. During this update process you will several times see the wifi activity light become steady for a while, and flash for a while.
AFTER 5 MINUTES HAVE ELAPSED (please be sure!), turn the G2's power off and then turn it on again.
You may now close this wifi router control page
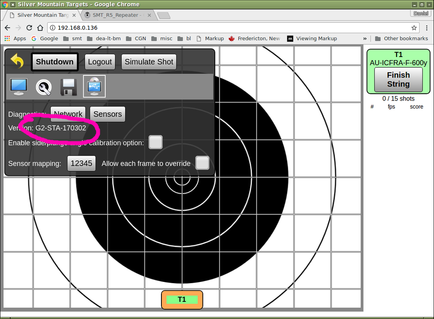
Confirm a successful update: open a browser window to your G2 at 192.168.0.xx where "xx" is your unit's number written on its battery cap..
Go to the GEARWHEEL menu and the "USB" submenu, and confirm that the "Version" string indicates you are now running the latest firmware version.
Go to the GEARWHEEL menu and the "USB" submenu, and confirm that the "Version" string indicates you are now running the latest firmware version.
