Silver Mountain Targets
  • home
    • SOLO Baseline Accuracy Test
  • E-Targets
    • Installations Map
    • For Shooters
    • For Clubs
    • For Installations
  • Simulator
  • Past Results
  • Resources
    • Getting Started
    • Documentation
    • Target Faces
    • Firmware Updates
    • Videos
    • HOWTOs and AppNotes
    • Blog
  • Contact
    • Dealers
    • Mailing List

Diagnosing G2 wifi damage

4/16/2018

1 Comment

 
A recent SMT application note warned of permanent damage that _may_ occur in a small number of cases if an antenna is connected or disconnected from a powered-on G2.  If this happens, the G2's receive sensitivity is permanently damaged and as a practical matter becomes unable to communicate outdoors at shooting distances.

If this has happened to your G2, it will be necessary to have the internal circuitry replaced by the SMT factory or by your SMT dealer.  If this damage occurred before the end of April 2018 SMT will pay for the repair however you it will cost you shipping plus a loss of use your unit while repairs are being made, so it is important to avoid "false alarms" and only send in your G2 if it is actually damaged.

If you are having wifi problems you might want to review the more common causes of wifi problems which do not involve damaged hardware in our HOWTOs and appnotes section (if you are using more than one R5 then you are probably doing something wrong!!)

To determine if your G2 has experienced wifi damage you can conduct the following test indoors.   You will require:
  • your R5 Repeater
  • your G2 measurement unit, with its foldable omni antenna attached
  • a viewing device (aptop computer, tablet etc)
Install charged batteries into your G2 and R5 and turn them on.  Place them in the same room, as far apart as practical.  A good choice is to stand up the R5 on a shelf at one end of the room, pointing to the G2 sitting on a table at the other side of the room.

Firstly, connect your device to the wifi network SSID SilverMountainTargets

​Then, log in to your R5:
  • open a browser window and go to the address 192.168.0.5
  • You should see a login screen; the username is root and the password is root

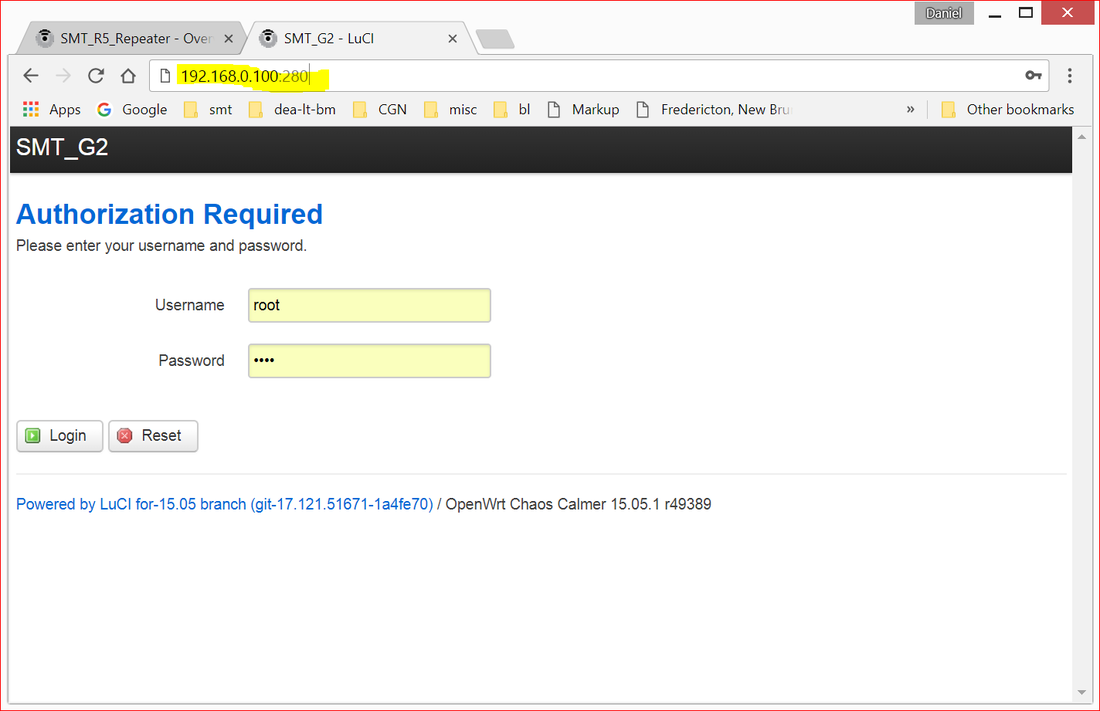
Then, open up another browser window or tab and connect to the special network access and control page on your G2:
  • the address to use is your regular IP address, plus a colon character ":", plus the number 280.
  • For example, if your G2's battery cap says "100", you would go to 192.168.0.100:280
  • You should see a login screen; the username is root and the password is root​
Picture
Once you have logged in to your G2's network access and control page, scroll to the bottom and examine the "Associated Stations" section.
​
Look for a MAC address that begins with C4: or C6:​ and note the reported signal strength.  It is normal for the signal change to fluctuate over a range of perhaps 5 dBm.
Picture
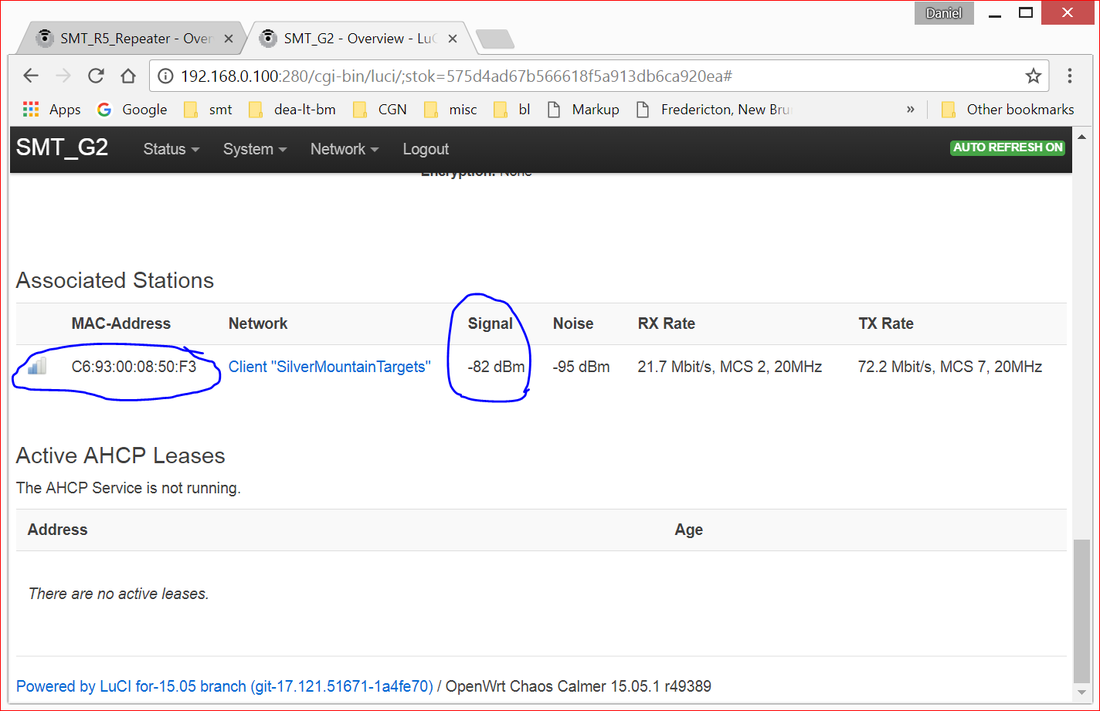
Now make the same observation on your R5.  There will be more than one line present, so identify the one whose MAC address begins with C4:, that will be your G2.
Picture
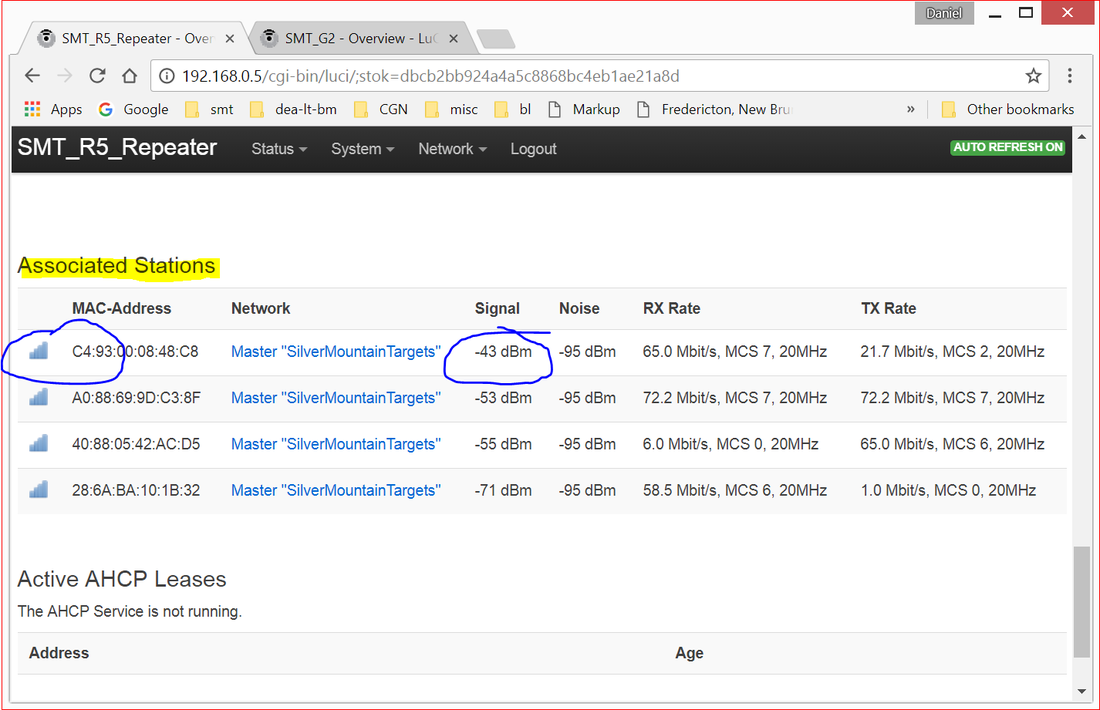
In the screenshots above, you can see that:
  • my R5 is seeing the G2's signal strength as -43 dBm
    • which is a pretty typical number for an indoors setup
    • for an indoors setup as I've described you'll typically see -30s..-50s
  • my G2 is seeing the R5's signal strength as -82 dBm
    • which is very weak
    • and more importantly, is significantly different
If a G2 has suffered permanent wifi damage, it will show a significantly different signal strength compared the the R5 reading.  In this case, the G2 unit I am using is damaged and needs to be repaired/replaced.

If your G2 and R5 readings differ by less than 10 dBm, then your G2 and your R5 are working correctly.  Remember that it is normal for these readings to fluctuate, so spend 15 to 30 seconds watching the readings change and use the average or typical signal strength reading that you see.

If your G2 is good according to this test and you are experiencing wifi problems at the range, please:
  • review our HOWTOs and appnotes section for items related to wifi usage
    • in particular only one R5 should be used
    • it should be mounted above ground level, with a clear view of the target.
    • the G2 panel antenna should be as far above-grade as possible, with a clear unobstructed view of the R5 on the firing line
  • if you still have problems even though you are doing everything right, please contact your SMT dealer for additional help

1 Comment
Donna Harvey link
1/7/2021 20:45:05

Much appreciate you writing this

Reply


Leave a Reply.

    Author

    Write something about yourself. No need to be fancy, just an overview.

    Archives

    April 2018
    July 2017

    Categories

    All

    RSS Feed

Picture
for shooters, by shooters
info@silvermountaintargets.com
Sign up for mailing list
  • home
    • SOLO Baseline Accuracy Test
  • E-Targets
    • Installations Map
    • For Shooters
    • For Clubs
    • For Installations
  • Simulator
  • Past Results
  • Resources
    • Getting Started
    • Documentation
    • Target Faces
    • Firmware Updates
    • Videos
    • HOWTOs and AppNotes
    • Blog
  • Contact
    • Dealers
    • Mailing List