|
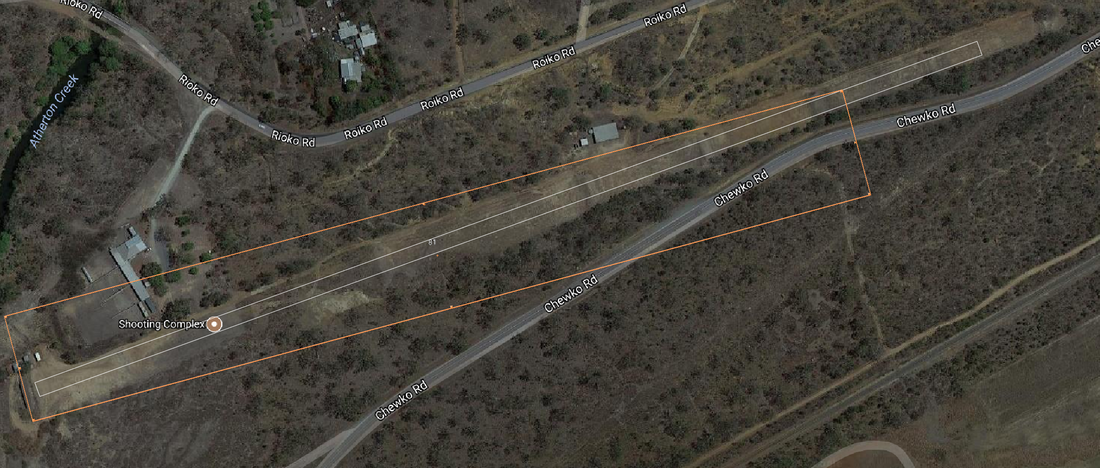
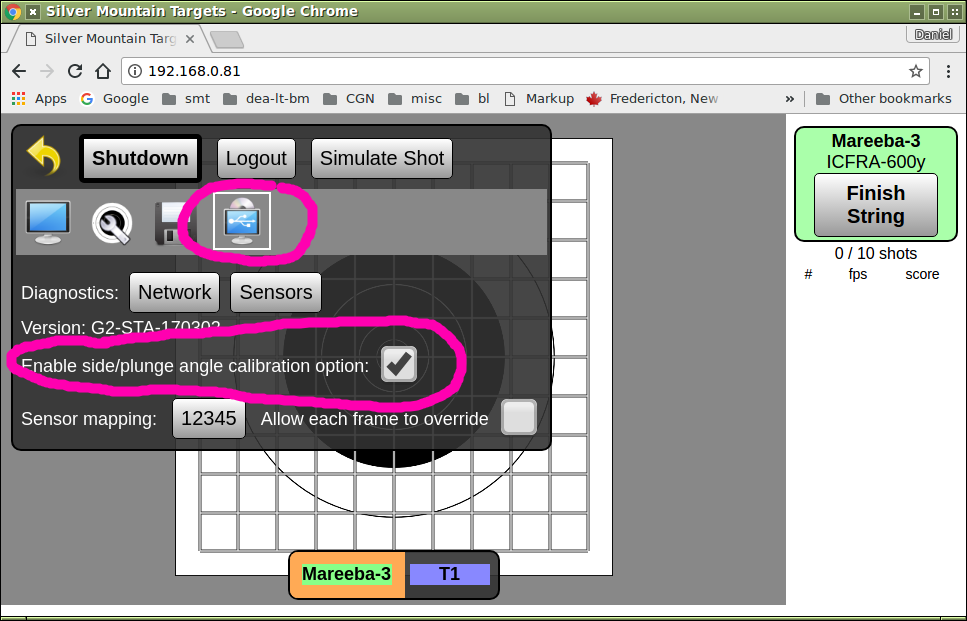
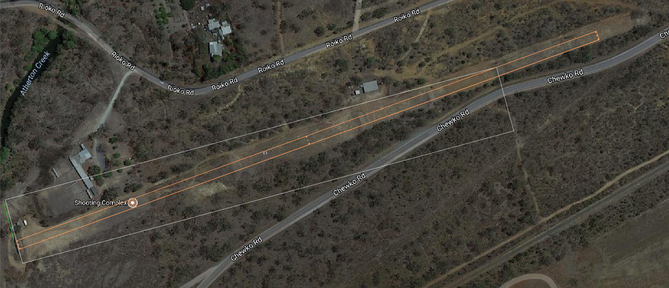
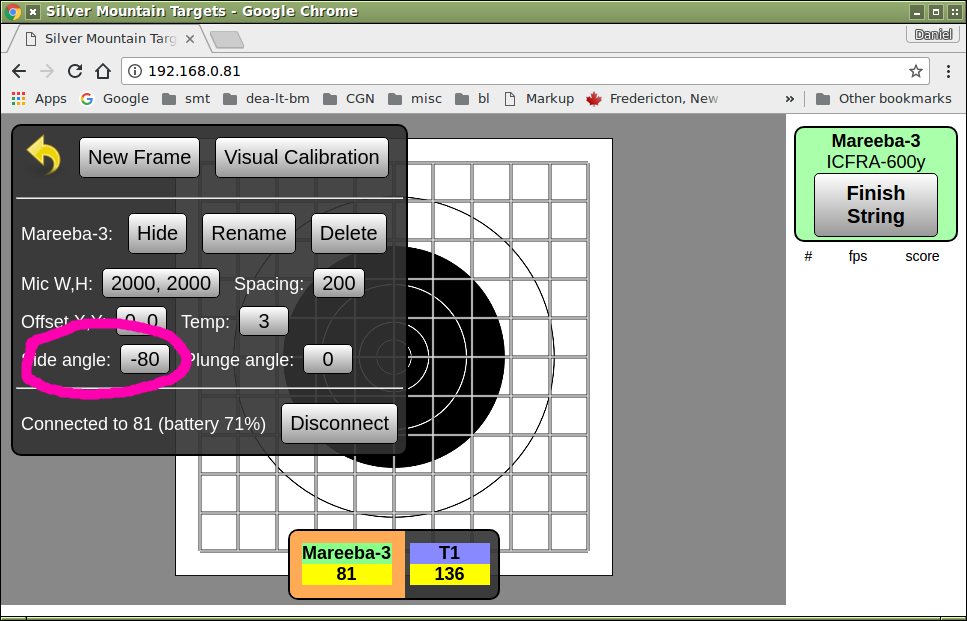
Sometimes Rule 1 TRY FOR PERFECTION in your setup is not possible or convenient. One of the great things about outdoor target rifle shooting is getting to shoot at different ranges. One of the true pleasures of running an electronic targets company is getting to visit more ranges than I otherwise might, and to work with people all over the world on many different and interesting rifle ranges. Here is a nice range in Mareeba, in northern Queensland, Australia. Open it up in googlemaps and try one of my favourite hobbies, which exploring rifle ranges from afar. Zoom in on the targets area and you might be able to see that the target line at Mareeba has been built at a bit of an angle with respect to the main range axis and therefore the incoming bullet path. While most military ranges are built like parade squares, precisely surveyed and with every angle a perfect right angle, it is surprisingly common for civilian-built ranges to have their firing line built not exactly perpendicular to the incoming bullet path. Fortunately, this "fault" basically doesn't matter and in no way affects the usefulness or fairness of the range. I took a screenshot from googlemaps and then used a graphics editing program to create an orange rectangle that is aligned with the row of targets, and a white rectangle that is aligned with the shooting axis of the range. You can see the extent to which Mareeba's target line is not perpendicular to the incoming bullets. The target face on this range doesn't actually point directly at the shooter., it actually points a good deal to one side of the shooter. A carefully-installed set of microphones on a target face here would end up not actually pointing at the shooter, which is what the internal calculation math assumes. If we don't do something about this, a careful shooter might be able to notice some measurement errors (mostly in the sideways component of the reported bullet position). So - if we want to install an e-target here and have it give us the utmost precision, what should we do? One way would be to mechanically alter the mounting arrangements for each target frame, so that the target face DOES point to the shooters. Sometimes this is an easy and practical solution, if so that's the route you should take - alter the mounting arrangements of the targetframe so as to directly counteract the angle of the range itself. Another way, which is the subject of this article, is to have the SMT software correct for this during the calculation process. Let's get started. First, we must turn on this advanced option. Become ADMIN, click on the GEARWHEEL, then the "USB" sub=menu and tick the "Enable side/plunge angle calibration option:" box: 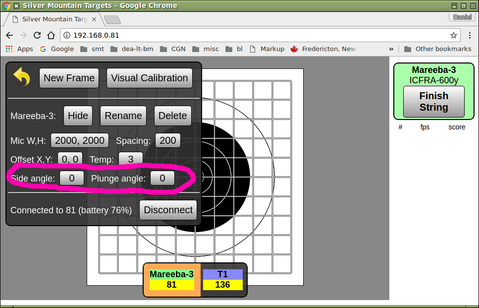 Now when you go to the ADMIN -> TARGETFRAME screen,you will see two new fields available, for us to tell the software the known amount that the targetface is NOT perpendicular in the side-to-side direction or the vertical direction. For now they are zero, meaning that the e-target assumes everything is at perfect right angles The units of side-angle and pluing-angle are mils (milliradians). An angle of one mil is one part in a thousand, which is a pretty convenient way to measure angles for our purposes here. We know from my brief graphics exercise above that the shooter's position on the firing point is a certain amount to the RIGHT the the hypothetical line that the targetface is pointing. If one of your club members or friends is a surveyor, invite him out and he can tell you the angle you need to know. Or, you can make an approximate (and good enough for our purposes) measurement with your graphics program. How you do that will depend on your graphics program - if it is able to measure angles for you, do that and you are done. My graphics program didn't let me directly measure angles but it did let me measure distances. Here is what I have done. Have a look at that first picture again (click here for higher-res), but note that I have added a GREEN bar, which is the amount of sideways displacement (to the nearest metre or two) of how far sideways the 600 yard firing point is displaced: From this exercise I can see that green line is 50 yards long, meaning that a shooter lying down in his designate position on the 600 yard firing line is actually about 50 yards north(ish) of where he "should" be, if he were to be perfectly aligned with the target. To calculate the angle you divide the sideways displacement by the distance to the target, an then multiply by 1000 in order to give the result in units of mil , So in this case it is 50 yards divided by 600 yards times 1000mils which equals 80 mils. Because the shooter is to the RIGHT of where he "should" be, the angle we use has a negative sign. If the shooter were to the left we would use the same number but it would be positive. Here is how we tell the targetframe that we expect all of our bullets to be arriving at an angle of minus 80 mils: Now when you go shoot, you should see the at-target bullet speeds agree with the predictions of your ballistics program. And, sideways "stretching" or "shrinking" should be eliminated.
4 Comments
mendoje
10/1/2017 02:43:47
Hello I just read this article, but I need more information, as we have this exact situation at our club range, and we do not have the option of adjusting the targets perfectly perpendicular to the firing points. Our 600 yard target faces are pointing to the left of the shooter, and pointing high above the shooter. in this case, what is the sign of the angles?
Reply
John Harris
12/13/2020 12:53:27
I too am experiencing this problem, or least that is what the agent tells me is the reason that my new Solo does not record any shots.
Reply
Leave a Reply. |
AuthorWrite something about yourself. No need to be fancy, just an overview. ArchivesCategories |
|
for shooters, by shooters
info@silvermountaintargets.com |

 RSS Feed
